home - installation
- data
preprocessing and editing - data review and
visualization - statistics and extended data analysis -
user
interface reference
Marker analysis
The marker analysis is concerned with timing information needed
for the analysis of other channels, exporting values or
event-related averaging. It reads timing information from a raw
data file, either as a dedicated data channel, an associated file
or as information from the data file header, and produces easily
readable und modifyable time tables, stored as text-files. It can
also be run without dedicated marker/trigger information,
subdividing the length of the entire file in a certain number of
segments, or fill up the file duration with segments of a
fixed size. The latter is called "parametric" marker type, the
former "standard" marker type.
Timing files
Timing files in EMEGS are needed for certain analysis types that
require timing information (such as STARTLE, SPECTRAL,
CROSSSPECTRAL, ICG), for exporting values and for timed data
read-in. Other then by using the MARKER analysis, they can also be
created in a text editor or a table calculation software like
OpenOffice.Calc or Microsoft Excel.
Timing
files must always live in the same directory as the raw data
file they refer to. They must be named identically to
the raw data file except the file extension which must be
>> .t <<.
So a varioport data file named TEX05402.vpd
would have an associated timing file called TEX05402.t (these two files are
included in the test data folder). The content of the timing
file, which is a standard tab-delimited text file, is a 6
column table with one header row. Here you can see an example:
Condition
Start
End
Duration SegmentNr
ConditionNr
11
151.7480469 159.7636719
8.015625
1
1
21
169.2929688 176.3183594
7.0253906 2 1
31 185.9492188
193.9648438 8.015625
3 1
31 215.2246094
223.2402344 8.015625
4 2
21 232.2617188
239.2949219 7.0332031
5 2
11 249.3867188
257.4121094 8.0253906
6 2
31 266.5214844
273.5566406 7.0351562
7 3
21 283.96875
291.9941406 8.0253906
8 3
11 300.2832031
307.328125 7.0449219
9 3
31 317.2382812
325.2539062 8.015625
10
4
21 333.4726562
340.5078125 7.0351563
11
4
31 349.8886719
357.9042969 8.015625
12
5
Condition is
usually the trigger/marker value, Start
and End are time points
relative to file start time in seconds. The Duration,
SegmentNr and ConditionNr columns are included for
readability only, and are otherwise ignored by the program. So
when editing or creating timing files by hand in a text editor,
excel or other program, you do not need to worry about keeping the
these columns in order. In fact, you do not event need to have these
columns at all.
Timing file subsections
Timing files can include several timing definitions to be used
alternatively. This is needed for instance when data channels have
different response windows, such as EDA (from around one to a few
seconds after stimulus onset ) and EMG (within the first second
after stimulus onset). A new section in a timing file starts with a
line containing only the section name (or the section "tag") and the
colon-character. For instance the above file could look like this to
hold a second timing set called "eda":
Condition
Start
End
Duration SegmentNr
ConditionNr
11
151.7480469 159.7636719
8.015625
1
1
21
169.2929688 176.3183594
7.0253906 2
1
31
185.9492188
193.9648438 8.015625
3 1
31
215.2246094
223.2402344 8.015625
4 2
21
232.2617188
239.2949219 7.0332031
5 2
11
249.3867188
257.4121094 8.0253906
6 2
31
266.5214844
273.5566406 7.0351562
7 3
21
283.96875
291.9941406 8.0253906
8 3
11
300.2832031
307.328125 7.0449219
9 3
31
317.2382812
325.2539062 8.015625
10 4
21
333.4726562
340.5078125 7.0351563
11 4
31
349.8886719
357.9042969 8.015625
12 5
eda:
11
149.7480469
159.7480469
10
1 1
21
167.2929688
177.2929688 10 2
1
31
183.9492188
193.9492188 10 3
1
31
213.2246094
223.2246094 10 4
2
21
230.2617188
240.2617188 10 5
2
11
247.3867188
257.3867188 10 6
2
31
264.5214844
274.5214844 10 7
3
21
281.96875
291.96875 10 8
3
11
298.2832031
308.2832031 10 9
3
31
315.2382812
325.2382812 10 10
4
21
331.4726562
341.4726562 10 11
4
31
347.8886719
357.8886719 10 12
5
The first section is the (unnamed) default section and is processed
if the section name is empty or not defined.
The MARKER analysis is meant to be run in batch mode, since it is a
strictly rule-based process which requires no user interaction with
the data. All analysis options can be configured beforehand. But
since the analysis itself is quite fast, the process can be repeated
with adjusted settings if the result is not as expected.
Moreover, the marker analysis also serves to modify existing
timing information from previous analysis runs. This is done using
the "modify" mode, whereas extracting information directly from
the raw file is referred to as "standard" mode.
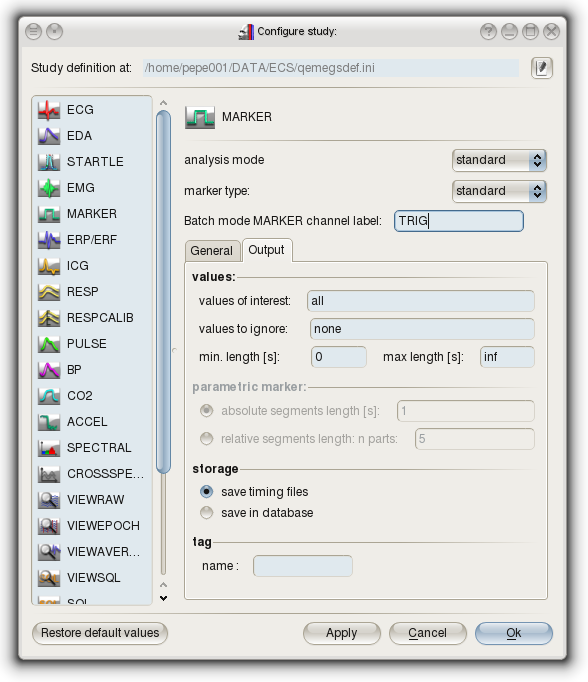
The marker configuration page on the configure-study-dialog for
the standard mode is given here below.

You can restrict the values EMEGS extracts from the data files by
using the fields values-of-interest and values-to-ignore and also
using a minimum or maximum event length.
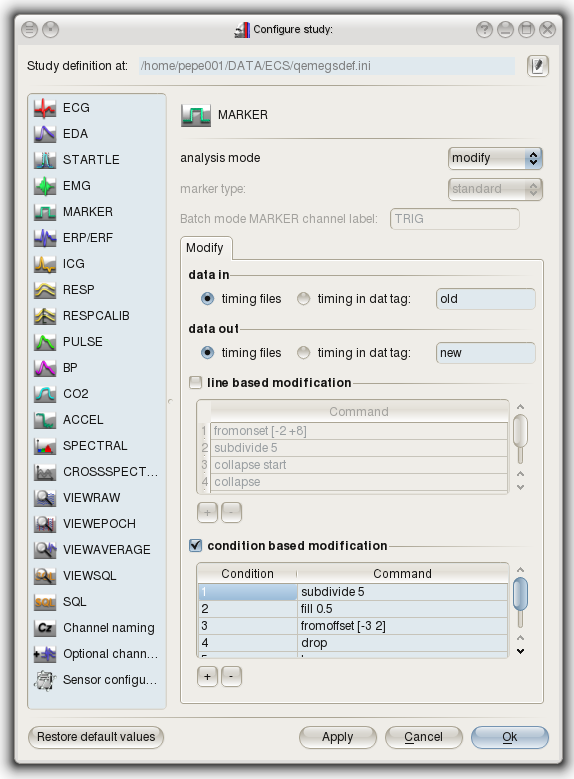
The marker configuration pagen for the modify mode looks a little
different:

Allowed commands in the modification tables are explained in the
following table:
| Command |
Explanation |
| subdivide n |
subdivide the corresponding segment in n parts
of equal length
|
| fill n |
fill the corresponding segment with segments of length n
|
| collapse start |
collapse segment from collapse start
through collapse to collapse end into one
bigger segment
|
| collapse |
see above
|
| collapse end |
see above |
| leave |
leave the corresponding segment unchanged
|
| drop |
drop the corresponding segment
|
| fromoffset [n m] |
change the timing of the corresponding segment by adding
n to its onset and replacing its offset
by onset + m |
| fromonset [n m] |
change the timing of the corresponding segment by
replacing its onset by offset + n and
adding m to its offset |
recode n
|
change the name of the corresponding
segment/condition to n
|
The condition based modification applies these commands
depending on the condition value (trigger value), the line based
modification depeding on the line number.
Note:
To apply a command to all conditions in a file, you can use the
wildcard character * in the
Condition column. Multiple conditions (but not all) per command
are not yet supported, but will be in future releases.
Combined with the data in tag and data out tag
field, you can for instance use the leave command, to copy
segments from one tag to another, or you might use the leave
and drop commands to extract certain lines or conditions
from one tag and store them in a different one.
With the commands given above the modify-mode offers you a set of
very powerful tools to adjust your timing definitions according to
your needs.
Timing defintions in the database
Rather than creating timing files, you can also choose to save all
timing information in the database. Except for the way the
information is stored, there is no difference between timing files
or timing definitions in the database. Both mechanisms allow you to
work with multiple tagged subsections for the same raw data file,
and both mechanisms allow for modifications using the modify-mode
of the MARKER analysis.
Keeping timing definitions makes it a little more difficult to edit
or view the segment definitions, but keeps everything neatly
together with the rest of the data. To delete timing definitions use
the Delete data & segments dialog, which is described here.
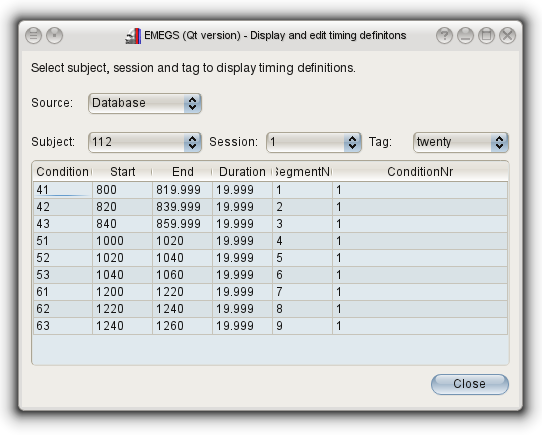
To view timing definitons in the database, use the Timing editor
dialog. It is available in the "Tools" menu, in the "Database tools"
submenu, and looks like this:


